Our hosting system takes hourly backups of your website and stores them offsite.
In addition, there is a secondary backup system that can backup to your own cloud storage, Dropbox or Google Drive, and has a 30 day retention period.
Backups are typically always under-valued and we strongly believe you should have at least two backup systems in place and hold a copy of your backups.
The video below walks through how to access the hourly backups in our hosting control panel as well as how to connect your cloud storage and configure nightly backups.
If you can connect to your remote storage (you’ll need to do this on your end as we don’t have access to your storage logons) our team can help setup these backups for you.
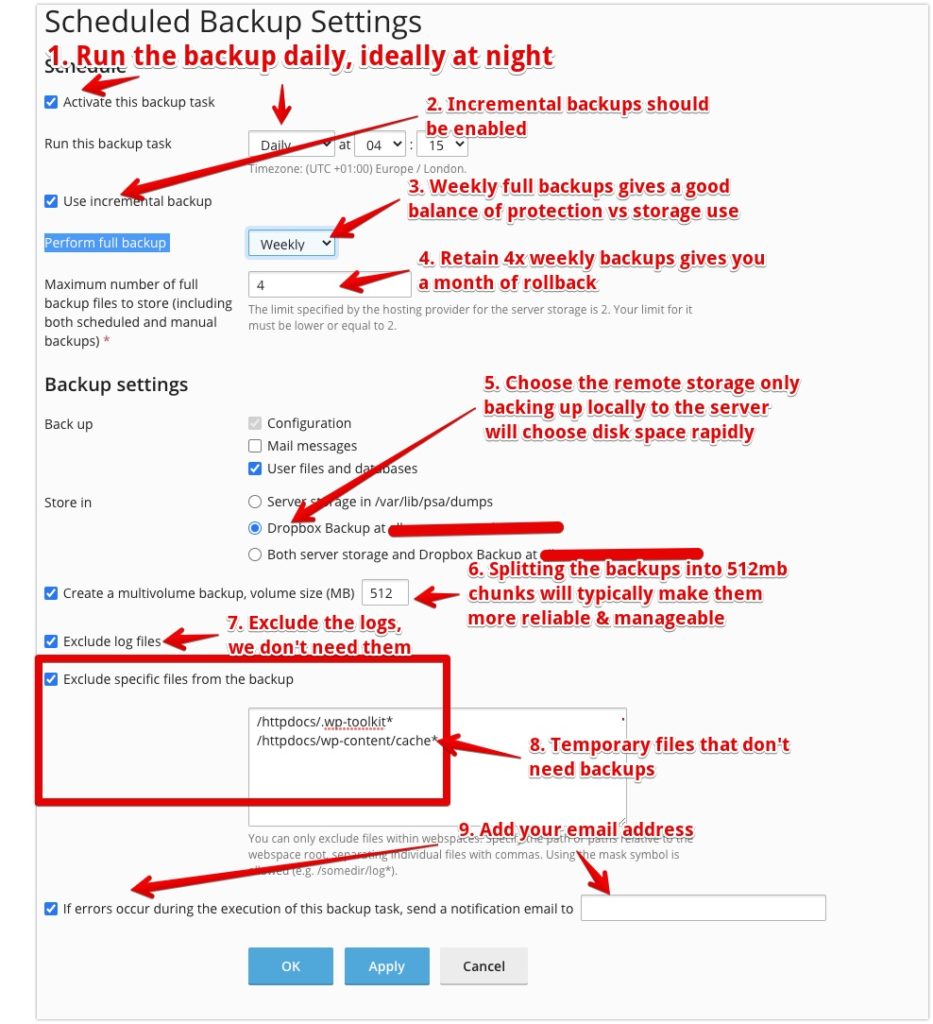
If you want to configure the backup yourself, the screenshots below highlights the settings we recommend you use. These give a good balance of performance, reliability and storage use vs. data protection.
Accessing the backup system
The hourly backup system is accessible in the sidebar under Acronis Backups. Note that this doesn’t run at exactly 1 hour intervals. The interval may be slightly longer or shorter depending on how many changes were made and how busy the site is. More changes mean the hourly backup takes longer to complete.
The secondary backup system is accessible under Backup & Restore


Setting up the backup job schedule

Settings to configure:
- Activate this backup task – this turns on the job. You want to schedule this to run Daily ideally after hours
- Use incremental backups – doing a weekly full backup and daily incremental is a good balance of performance vs data protection
- A weekly backup is best for data protection but if you have a very large site or limited remote storage, monthly full backups would be a better option
- Choosing to keep 4 full weekly backups is ideally and will give you ~30 days of rollback
- Backup to the remote storage only, using server storage will quickly chew your disk space
- Split the backup into 512mb chunks. This will make the backup itself more reliable AND make it much faster to restore especially for larger websites.
Without splitting the backup, the server will need to download the entire backup before it can restore a single file. If the backup file is even just a few GB this process will take time. With the split backup file method, the server only needs to download the specific backup file(s) that contain whatever you are restoring. - Exclude the log files, these don’t need to be backed up and in any case are contained in our hourly backups and server level backups.
- These exclusions remove temporary files from our backup
The custom exclusions to add are:
/httpdocs/.wp-toolkit*
/httpdocs/wp-content/cache*
The /cache folder is a temporary folder we don’t want to backup and the /.wp-toolkit folder is a temporary staging site location used for testing patches before going live. - Add your email address to the alerting. The backups most often fail if the server gets disconnected from your storage and needs to be reauthorized or the server was unusually busy or there was a connectivity issue to the remote storage during the backup process.