
FlyingPress is one of our recommended WordPress performance plugins. You can get it at flyingpress.net. We generally recommend either WP Rocket or FlyingPress – broadly speaking, the difference between the two is that FlyingPress is a bit more aggressive in terms of what it can do with optimizations and it can be faster in some circumstances, whereas WP Rocket focuses more on stability and reliability.
In this post, we walk you through the settings we use after optimizing 5,000+ WordPress sites at WP Speed Fix. These are the optimal FlyingPress settings based on what we’ve found works best for speed, reliability, and passing Core Web Vitals.
One thing to keep in mind: we never want to sacrifice reliability for speed. If you have a complex website, a heavy website, or something like a WooCommerce site with a lot of plugins, you need to be mindful that you’re not getting too aggressive with optimization. When you get too aggressive, you tend to break things in ways that aren’t immediately obvious – things like sliders, accordions, or menus can break and maybe only on some devices.
Table of Contents
FlyingPress Settings Video Walkthrough
If you prefer to watch rather than read, here’s our full video walkthrough of every FlyingPress setting:
Video transcript: Flying Press Plugin - Best Settings & Configuration For Site Speed
0:00FlyingPress vs WP Rocket: Reliability Before Speed
WP Speed Fix. In this video, I'm going to talk about FlyingPress and FlyingPress settings: the optimal settings, the settings that we use after optimizing 5,000 plus WordPress sites at WP Speed Fix. FlyingPress is one of our recommended plugins. You can get it at flyingpress.net. We generally recommend either WP Rocket or FlyingPress, so wprocketplugin.com or flyingpress.net.
Broadly speaking, the difference between the two is that FlyingPress is a bit more aggressive in terms of what it can do with optimizations, and it can be faster in some circumstances. In my last video, where I talked about the best WordPress caching plugins, we talked about the difference between the two. WP Rocket focuses more on stability and reliability, and FlyingPress is a bit more aggressive, but it can be faster. Broadly speaking, though, we never want to sacrifice reliability for speed. If you have a complex website, a heavy website, or something like a WooCommerce website with a lot of plugins, you just need to be mindful that you're not getting too aggressive with optimization. When you get too aggressive with optimization, you tend to break things in a way that isn't immediately obvious. Things like sliders or accordions or menus can often break, and it may be only on some devices, so it might not be immediately obvious, particularly with some of the more aggressive JavaScript optimizations.
1:32The FlyingPress Dashboard and How Page Caching Works
Anyway, with that said, here we have a site with FlyingPress installed. Right now it's version 5.3.2, which I believe is the latest version. I'm just going to run through these pages and explain what we have here, what we use and what we don't use, because there are some settings here that can send you astray and can actually hurt the speed and reliability. So let's get into it.
On the dashboard, it's pretty standard stuff. You can preload the cache, so that builds the pages in advance. Remember, page caching is where the WordPress pages are built in advance and saved on the server, ready to go for when the visitor comes to the site. They can just be served up. All the database lookups, all the PHP processing, everything is done, ready to serve that page. If a page is not cached, then all that work has to happen on that page load. That can take anywhere from 1 to 10, even 20 seconds with a heavy site or a site that has problems. Once that work is done, that page is saved. If you don't have caching, then that has to be done every single time the page is loaded. You can see that's going to be very slow and also put a lot of load on the hosting. So we need caching in order for WordPress to run fast, and that's what a cache does.
All caching plugins can preload the cache in advance. What that means is they will go through the sitemap, or go through the site in some sort of way, and start loading those pages. It will load those pages like it's a regular user, which then causes the plugin to build those pages and save them. So that's what that's about. You have preload cache, and purge and preload, which flushes the cache and preloads it. It also just tells us the cache status. This is a tiny website with only a handful of pages, so we've only got nine pages cached in total. That's the entire website.
3:08Why We Never Use Minify CSS or Minify JavaScript
Let's go through these pages here. Optimization. There's a lot of stuff on here. In one of my other videos, I talked about how we do not use minify at all for CSS or JavaScript. It's a stupid optimization. It doesn't do anything for speed. It makes the files a tiny bit smaller. It basically strips out all the line spaces and the comments and it makes the files a little bit smaller, but modern web servers have gzip and Brotli compression, which is way more powerful and way more effective. Stripping out a few characters here and there is going to do nothing for speed. It also can break caching in some circumstances.
I'm going to show you what I mean here, because I explained it in the last video but didn't show a demo. Here is this site, and I had caching turned on. Here's what happens when it optimizes, or it builds the minified CSS file. It creates a temporary file name like this. This is not a great example because it's related to Google Fonts, but for the purpose of this video, it creates a file name that is just a random string of characters. Every time I clear this cache, this file name changes. What that means is, if I have visitors who've been to the site and then they come back and I've refreshed the cache, that CSS file is no longer the correct file. It's no longer relevant in their browser cache. Their browser has to download it again from the website, so that makes their second visit experience slow.
The other issue is that it can break the site in some cases. If we're using page caching and Cloudflare caching, sometimes it can cause those to mismatch, and you have a version of the site that's pointing to CSS files that no longer exist. So it can create problems with aggressive caching. We don't use it at all. We turn off minify for both JavaScript and CSS. It doesn't do anything for speed. Again, reliability is more important than speed. We want reliability, and it actually can break the cache in some circumstances and, in some scenarios, make the user's experience slower than if we had just left it alone.
5:03Remove Unused CSS and Not Doubling Up Optimizations
Optimizing the CSS by removing the unused CSS: we've got it turned on for this website. Whether or not this does anything beneficial for your speed depends on your theme. If you have a modern theme that's very lightweight, you might not need this. Or if the theme is already optimizing the CSS, you don't want to use this. We've got it turned on here because the site design's a little bit heavy.
Broadly, you want to be careful. You don't want to do two optimizations, or the same optimization, in two different places. If you have the theme optimizing the CSS, which for more modern themes you probably want them to do, like GeneratePress, and you have CSS optimization there, you don't want to use it in the plugin. Just be careful not to double up optimizations, because if you layer the same optimization twice on the website, again, it can break things, make things unreliable and make things slower. Just keep that in mind: if you have some part of the website, or a service like Cloudflare, doing an optimization, you don't really want to duplicate it.
6:15JavaScript Defer, Delay and How To Test for Breakage
JavaScript optimization. We don't do this. We try to avoid this loading scripts or delaying JavaScript business. These two are related: load third-party scripts on interaction, and then delay JavaScript. This is JavaScript defer. It's not really delaying it. It's deferring the JavaScript, which means it doesn't fire until the page has finished, or the browser has finished downloading all the stuff on the page and started to render the page. So this is generally safe.
These here, load when idle and load after interaction, are basically pausing the JavaScript until the user interacts with the site. It will make the site look a whole lot faster in something like Google PageSpeed Insights. But the problem is, if the site relies heavily on JavaScript, like a WooCommerce site, you can end up breaking the site again and actually make the site slower. So you need to be mindful. This setting is quite safe. These two, you run the risk of breaking your site, so be very careful with those.
An easy way to test whether the site is broken or not with them turned on: load the site and don't interact with it. Don't move the mouse. Don't do anything. If the render is not complete, if it doesn't show the entire site, then it's broken the site in some way. You need to be careful. That is going to impact speed and usability, but it may also break the SEO. If Google comes along and the site is not loading the full, complete version, then it's not seeing a complete version of the site. Crawlers, even AI crawlers, if they don't see a complete version of the site, may not rank you, or you may even get a penalty. So just be careful.
Delaying JavaScript and delaying third-party scripts can make the site faster in some circumstances, and delaying some scripts like live chat is a very good idea, for example, because live chat scripts are heavy and slow. But if you defer, sorry, if you delay the core JavaScript that's needed to render the site, you can break things very quickly. Another test for whether you're breaking things: load the site here. We actually have some issues here. Load the site and then look at this console tab, and anything that's an error will show as red. You see here we're missing some, I don't know why, we're missing some images here. We have some images 404ing out. If you've broken the JavaScript with a JavaScript delay, then it will show up here. There'll be JavaScript errors. So that's another quick and easy way to test that. These three here are all related to delaying JavaScript.
9:00Self-Hosting Scripts, Lazy Loading, Fonts and Lazy Rendering
This one here, self-host external CSS and JavaScript, we'd say turn on. This is where you have the site referring to maybe a Google-hosted copy of some JavaScript, or some CSS that's hosted elsewhere. You probably want to host that on the site itself, because then you can control the caching. Generally we'd say turn that on. But again, check the render and check that console tab here. If you right click, inspect, and then load the console tab, you'll see if there are any issues with those settings.
Lazy loading and images. What lazy loading is, is that it doesn't load the image until you scroll down to that part of the page. It only loads the images above the fold, in this section here, and then as you scroll down it will load the images as you scroll. That makes the load much faster, much lighter. Generally we use all of these. Again, don't double these up. If you're using them in your theme, for example using lazy loading in your theme, you don't want to use it here in the plugin. Generally we have them turned on here.
Same thing with YouTube. YouTube has a couple of different lazy load options. One of them just doesn't load the video until you scroll down to that bit. The YouTube player is very heavy, so we always want to lazy load it. But there is another level of lazy loading where it just shows an image, like a preview tile for the YouTube video, and then when you click on that, it loads the whole thing. That's what that lightweight YouTube previews is, and that is the best one. Again, not all themes and not all page builders work with these settings, so just be careful with them. If you're on a modern theme, generally they will work fine. Some page builders have versions of lazy loading built in, particularly for videos, so just keep that in mind. Just be mindful, again, using these: turn them on, check the site and make sure it doesn't make anything wonky or strange.
These here we generally leave all on. Preload fonts: that will speed up the font loading, and we generally want to do that. Self-host Google Fonts: yes, we want to do that. Just bear in mind that Cloudflare also has this setting, so you don't use this setting here and then also use it in Cloudflare, because you're doubling up that optimization again. Then there's use system fonts first. This is kind of a delay setting where it'll render the site, then wait for the fonts to load, and then it will swap the fonts out. We generally turn all three of these on. Again, if you have a lot of fonts or a very complicated design, just look at the site and be mindful that none of these settings break the site. That's probably more common on older sites that have unusual font setups, so just keep that in mind.
Lazy rendering. This one is a bit of a 50/50 one. Again, we have a pretty simple design, it's just a static page with some images. If you have a complicated design, be careful with this one. You don't necessarily want to lazy render stuff. But for this site, because it's a simple site and it's not a long page, that's okay. So that's the optimization tab. Like I kind of said, a lot of these things depend on the site. Newer sites, or newer themes and builders, will be more compatible here, so just be mindful of that.
12:07Image Optimization and Next-Gen Formats
Let's talk about image optimization. Now FlyingPress has compression and optimization built in. Prior to this, we were using EWWW, which we still use. It's a very good plugin, but broadly speaking, all image plugins compress the files the same. If you Google anything like best WordPress image compression plugin, there are all these comparisons of which one does the best compression and whatever. They're all going to be roughly within 5% of each other. In terms of compression algorithms, they all use the same set of algorithms to compress stuff. They might be slightly different here and there, but they're all going to compress the images to roughly the same small size. So it's not a case of which one's better at compressing. They're all pretty much the same. It really depends on how fast.
We use EWWW Image Optimizer because it can use the server resources, like the server CPU, to do the compression, so it's quite fast to compress images, whereas most other tools will use an API. They dial out. They send the image up, the server compresses it, they get it back, which can be really slow if you have a site with 30,000 images that you need to compress. Just keep that in mind. This is a tiny site. Again, there are only 77 images, if even that many are live on the site, so we're just using the plugin here for compression.
Next-gen image file formats: you probably want to use WebP, it depends, but AVIF is a newer file format, so it'll probably be better than WebP. Basically the plugin will dynamically create versions of the images in WebP or AVIF format and it will serve up multiple versions of the image, so it will give the browser the option to download the optimized image. That's how that works.
In terms of compression, site type: lossless means no quality loss. If you have an e-commerce site, you probably don't want to use lossy. For our site, this is not a product site, so we don't really care about the image quality. We're happy to have a little tiny dent in the image quality for better compression. But if you have really high quality images, you want to use lossless. Lossless is a smaller file size with the same quality. Lossy is an even smaller file size again, and some loss of quality. Just keep that in mind.
Optimize new uploads: when you upload new files, do you want it to optimize them? Yes, you do. Generally this will make the upload process slower, so just keep that in mind. If you have a lot of files to upload, you might want to turn this off. In some cases, you might want to exclude images from optimization, and you can do that in here. That's pretty much it. That's pretty straightforward. There's really not much to configure there. But just keep in mind, if image quality is important, you want to use lossless here.
14:53Caching Settings: Preloading, Logged-In Users and Cache Refresh
Caching. Let's talk about this preloading. This is something called just-in-time preloading. This site, instant.page, not Instagram, instant.page is the page we want. This will explain how just-in-time preloading works. Basically there is a gap between when you hover on a link and when you click on it, and in that gap the page can be loaded. You can see there I was hovering over that for 3 and a half seconds. That's enough time for the browser to actually download the entire page. That's basically what preloading, or just-in-time preloading, is. I'm on the site like this, and when I'm hovering over stuff it'll start to load those links. You might be able to see it here in this window. Let's see. No, it's not going to work for me here. But anyway, that's what just-in-time preloading is.
Separate cache for mobile and desktop: you probably don't need this. But if you do have a separate site, or the page builder has separate pages for mobile and desktop, you do want that. Cache for logged-in users: if you're using a WooCommerce site, you probably want to turn that on. We don't have logged-in users on this site, so we don't use that. Same thing if you had an LMS, a learning site like a membership site, you probably want to leave that on. But we don't need it, so we have it off on this website.
Refreshing cache: I'd recommend probably doing this. You need to be careful for bigger sites, but basically what this will do is clear the cache and just roll it over. This is probably useful for most sites, because if for some reason a page is broken or the render is broken, this will flush it out and rebuild those pages. So we have this turned on, generally speaking. These ones here, you just want to exclude pages from caching if there's something you don't want to cache. If there were query strings that you want cached, because query strings are not cached by default, you can enable that here. There are also particular cookies. This is more advanced, so if you're poking around in there, you will know what those settings are for.
17:13Content Delivery Network: Use Your Own Cloudflare Account
Content delivery network. Let's talk about this. There are lots of different options here inside FlyingPress. We just use the Cloudflare integration here. We don't use a custom CDN. For our type of clients, Cloudflare is going to be the best. We don't use the FlyingCDN service. We would recommend that you use a Cloudflare account directly, and not FlyingCDN or any other integration with any cloud provider. You'll just get a better result using your own Cloudflare account, and you'll also be able to use things like the firewall and tweak a lot of the settings that you can use for SEO.
This one here is a new feature, enable page caching. This will actually save you money. This feature is $5 a month. It's the APO service from Cloudflare, but the plugin can do it natively without paying for that service. We've got that turned on, so it's a $5 a month saving there. If you have a simple site and you don't need the full APO service, that's what that does. Basically that caches the pages on the site on the Cloudflare network, so it'll make them even faster.
18:23Database and Bloat Settings, Tracking and Final Tips
Again, database optimization: there really isn't much to do here. If you have an older site, there might be some cleanup stuff here, but database cleaning, this kind of idea of cleaning your database, it's just nonsense. It's not like cleaning your teeth. You shouldn't need to use any of this stuff here. There might be some scenarios where you have a busy database where it might be relevant, but generally we'd say leave all this stuff off. If you have a really old site and you've installed the plugin for the first time, there might be a lot of things like transients that need to be cleared out. But this idea of cleaning the database doesn't do anything for speed. If your database is dirty and full of stuff, you've probably got a bigger issue that you shouldn't be DIYing in the first place. So we just leave all that stuff off. You don't need it.
This bloat stuff, we don't like to mess with this too much because it can break things again, and most of this stuff doesn't make anything faster. This heartbeat setting, you'll see this around the web. It doesn't do anything for speed. It's just a nonsense optimization. Some of this stuff, like limiting revisions, we don't, why would you do that? It doesn't make any difference for speed. It doesn't matter from a speed perspective whether there are three revisions or 10 revisions saved of a page. It does save space in the database, but again, that's not really going to impact speed unless it's an extreme scenario. Any of this stuff, we wouldn't really recommend using by default unless there are particular reasons. More often than not, you break things by turning this stuff on rather than make anything faster.
I think that's pretty much it. We don't use the Core Web Vitals tracking here, but you can turn that on and it will give you some basic tracking. For us, we use our Vital Signs Tracker tool. It's much more precise and granular, so we don't need it. But that's pretty much it. A few things to keep in mind. Reliability beats speed, so when in doubt, use the more conservative settings. An easy way to test if you're breaking things is in that console tab in the developer tools. You can see we have some things to fix on this site. Any errors that come with a page, or anything where something is going wrong with the page load, will show up here. Each page load will have its own set of warnings, and every page load there will be a list of stuff here. You can see there's something going wrong here. There is a typo somewhere, I suspect, in the code for this site.
So that's it. If you need help with your site, head over to our website. Let me type it in here and bring it across: wpspeedfix.com. We are a specialist site speed optimization and technical SEO agency, so we can help you with site speed. If you need help, go to the homepage and request a free audit here. We also have a bunch of free tools. There's no opt-in required. You use them for free. It takes 60 to 90 seconds to run a report. It's a free SEO audit, a free Core Web Vitals report and a free WordPress speed test. Feel free to use those, and if you have any questions, post in the comments section below. Cheers.
FlyingPress Dashboard
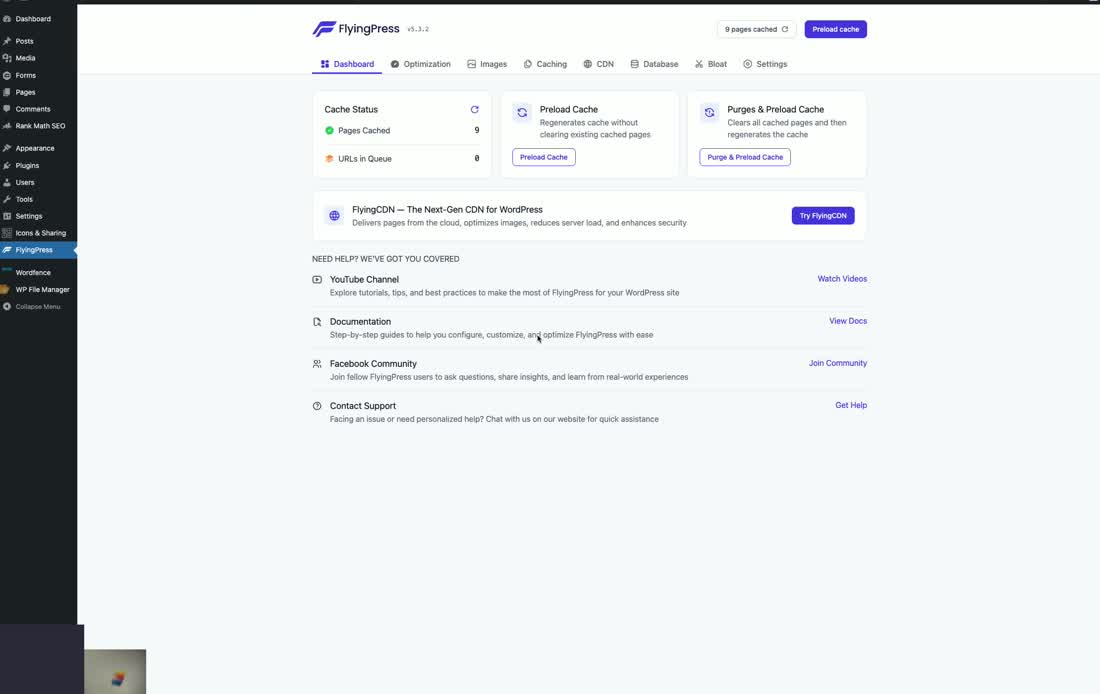
The Dashboard is pretty standard. You can preload the cache, which builds the pages in advance. Remember, page caching is where all the WordPress pages are built in advance and saved on the server ready to go for when a visitor comes to the site. They can just be served up – all the database lookups, all the PHP processing, everything is done and ready.
If a page is not cached, all that work has to happen on that page load, which can take anywhere from 1 to 10 or even 20 seconds with a heavy site. And if you don’t have caching, that has to be done every single time the page is loaded. So we need caching for WordPress to run fast.
From the Dashboard you can:
- Preload Cache – Goes through the sitemap and loads pages like a regular user, causing the plugin to build and save those pages
- Purge & Preload – Flushes the cache completely and then preloads it fresh
It also tells you the cache status – how many pages are cached in total.
Optimization Tab
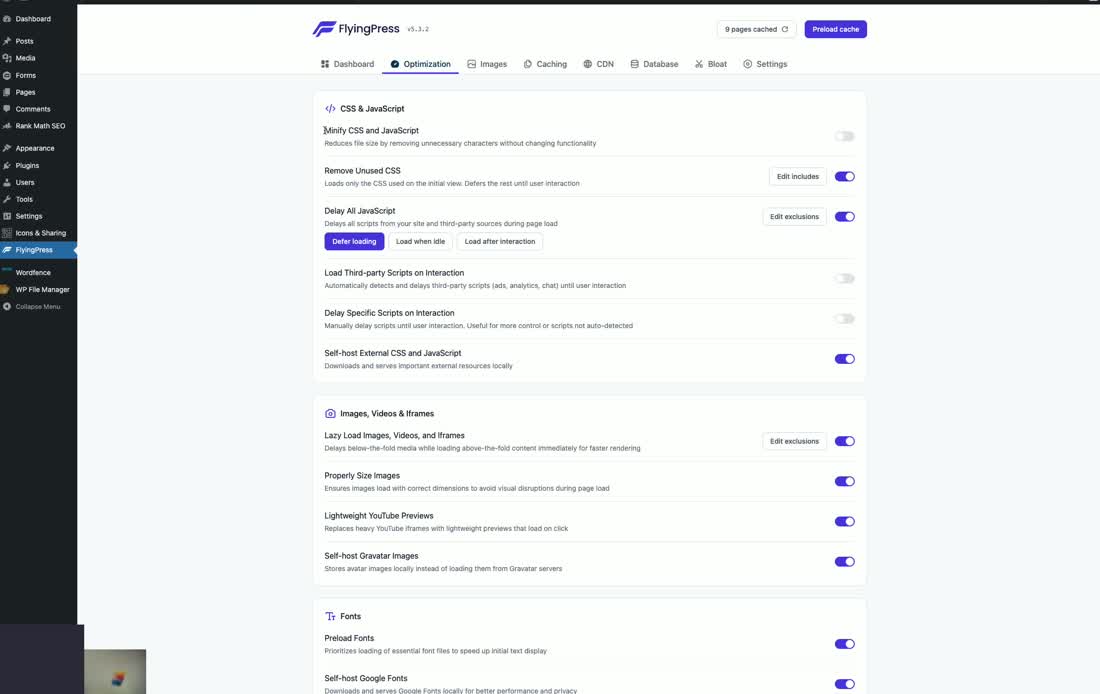
There’s a lot of stuff on this page. Let’s go through each section.
CSS & JavaScript Minification – Turn It OFF
We do not use minify at all for CSS or JavaScript. It’s a pointless optimization. Minification makes files a tiny bit smaller by stripping out line spaces and comments, but modern web servers have gzip and brotli compression which is way more powerful and way more effective. Stripping out a few characters here and there does nothing for speed.
Worse, minification can actually break caching. When the plugin creates a minified CSS file, it creates a temporary filename with a random string of characters. Every time you clear the cache, that filename changes. So if you have visitors who’ve been to the site and they come back after you’ve refreshed the cache, that CSS file is no longer the correct file in their browser cache – they have to download it again, making their second visit experience slower.
It can also cause problems with aggressive caching setups. If you’re using page caching and Cloudflare caching, the minified files can cause those caches to mismatch, and you end up with a version of the site pointing to CSS files that no longer exist. So turn off minify for both JavaScript and CSS.
Remove Unused CSS – It Depends
Whether or not this does anything beneficial for speed depends on your theme. If you have a modern theme that’s very lightweight and already optimizing CSS, you might not need this. We had it turned on for this site because the design is a bit heavy.
Be careful not to do the same optimization in two different places. If your theme is optimizing CSS (like GeneratePress does), you don’t want to also use it in FlyingPress. If you layer the same optimization twice, it can break things, make things unreliable, and actually make things slower. The same applies if Cloudflare is doing an optimization – don’t duplicate it in the plugin.
JavaScript Optimization – Be Very Careful
We try to avoid the loading scripts and delaying JavaScript settings. There are a few related options here:
Defer JavaScript – This means scripts don’t fire until the browser has finished downloading everything and started rendering the page. This is generally safe.
Load Third Party Scripts on Interaction / Delay JavaScript – These are the ones to be careful with. They basically pause JavaScript until the user interacts with the site (moves the mouse, clicks, scrolls). This will make your site look a whole lot faster in Google PageSpeed Insights, but if your site relies heavily on JavaScript (like a WooCommerce site), you can actually break the site and make it slower.
How to test if you’ve broken things: Load the site and don’t interact with it. Don’t move the mouse, don’t do anything. If the render is not complete – if it doesn’t show the entire site – then it’s broken something. This can also break SEO: if Google or AI crawlers don’t see a complete version of the site, they may not rank you or you may even get a penalty.
Delaying some scripts like LiveChat is a very good idea because those scripts are heavy and slow. But if you delay the core JavaScript needed to render the site, you can break things very quickly. Check the Console tab in developer tools (right click > Inspect > Console) – any JavaScript errors will show up as red.
Self-Host External CSS and JavaScript – Turn It ON
This is where the site refers to externally hosted copies of JavaScript or CSS (like Google-hosted files). You probably want to host those on the site itself so you can control the caching. We’d say turn this on, but again check the render and the console tab for any issues.
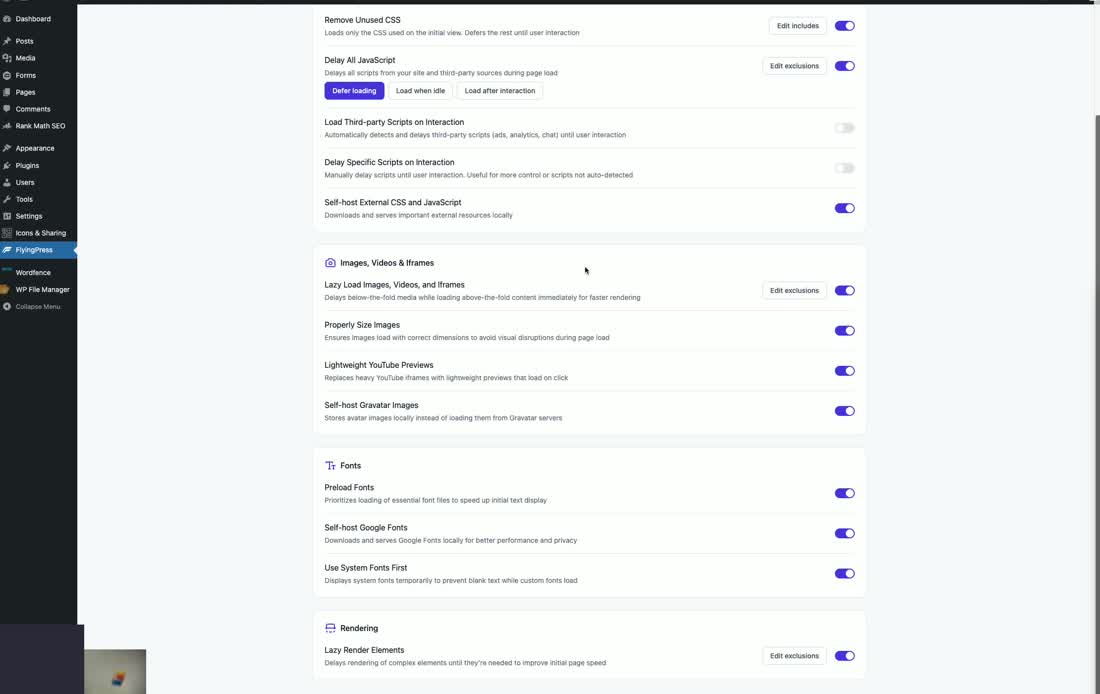
Lazy Loading Images, Videos & Iframes – Turn It ON
Lazy loading means images don’t load until you scroll down to that part of the page. It only loads images above the fold first, then loads the rest as you scroll. This makes the load much faster and lighter. We generally have all of these turned on.
Again, don’t double up. If you’re using lazy loading in your theme, don’t also use it in the plugin.
For YouTube, there are a couple of different lazy load options. The YouTube player is very heavy so we always want to lazy load it. The Lightweight YouTube Previews option just shows a preview thumbnail for the video, and when you click it loads the whole player. That’s the best option, though not all themes and page builders work with it, so just check your site.
Fonts – Turn Them All ON
We generally leave all three font settings on:
- Preload Fonts – Speeds up font loading
- Self-host Google Fonts – Bear in mind that Cloudflare also has this setting, so don’t use it in both places
- Use System Fonts First – A delay/swap setting where it renders the site with system fonts first, then swaps in the custom fonts once loaded
If you have a lot of fonts or a very complicated design, just look at the site and make sure these settings don’t break anything. More common issue on older sites with unusual font setups.
Lazy Rendering – 50/50
This one is a bit of a 50/50. For a simple static page with some images, it’s fine. If you have a complicated design, be careful with it. You don’t necessarily want to lazy render stuff on complex pages.
Like everything on the Optimization tab – a lot of these things depend on the site. Newer themes and builders will be more compatible. Just be mindful.
Images Tab
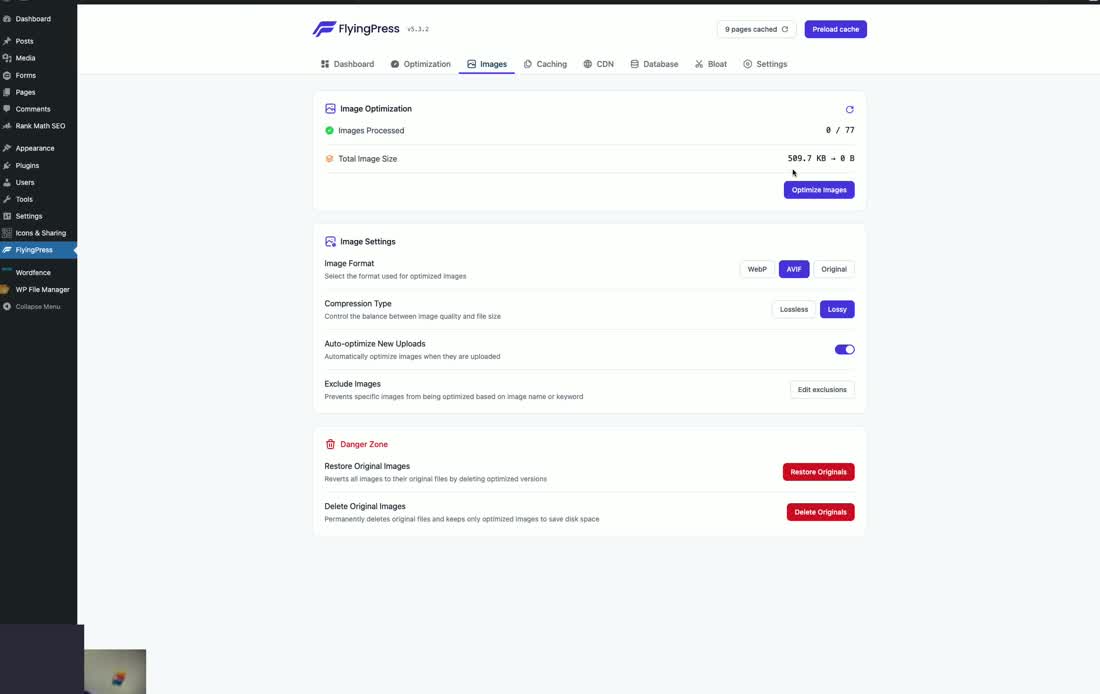
FlyingPress now has compression and optimization built in. Prior to this, we were using EWWW Image Optimizer, which we still use and is a very good plugin.
If you Google “best WordPress image compression plugin,” you’ll find all these comparisons of which one does the best compression. They’re all going to be roughly within 5% of each other. They all use the same set of algorithms to compress images, so it’s not really a case of which one is better at compressing – they’re all pretty much the same.
We use EWWW Optimizer because it uses server CPU to do compression, which is much faster than plugins that send images to an external API and wait for them to come back. That matters when you have a site with 30,000 images to compress.
For the plugin’s built-in image optimization:
- Image Format – AVIF is a newer format that’s probably better than WebP. The plugin will dynamically create versions of images in WebP or AVIF and serve the optimized version to browsers that support it
- Compression Type – Lossless means no quality loss. If you have an e-commerce site, you probably don’t want lossy. Lossy gives you even smaller files but with some quality loss. For non-product sites where image quality isn’t critical, lossy is fine
- Optimize New Uploads – Yes, turn this on. Just keep in mind it makes the upload process slower
- Exclude Images – If there are images you don’t want optimized, you can exclude them here
Caching Tab
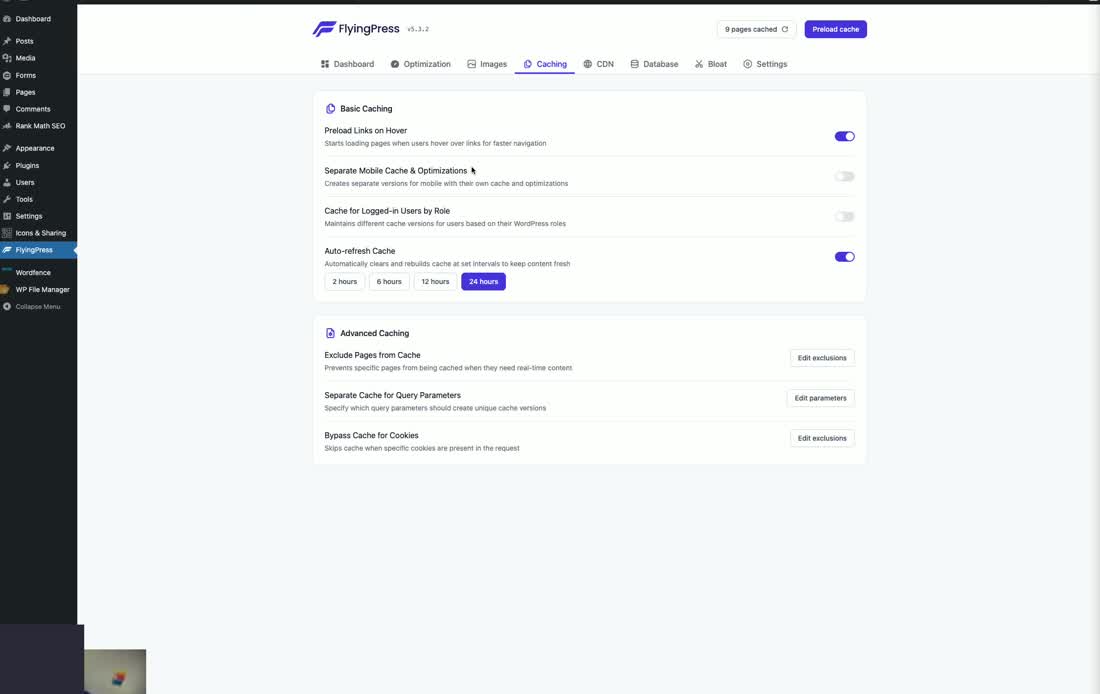
Preload Links on Hover (Just-In-Time Preloading) – This uses instant.page technology. There’s a gap between when you hover on a link and when you click on it – in that gap (which can be several seconds), the browser can actually download the entire next page. So when you click, the page loads almost instantly. Turn this on.
Separate Cache for Mobile and Desktop – You probably don’t need this unless you have a separate mobile site or your page builder serves completely different pages for mobile and desktop.
Cache for Logged-in Users – Turn this on if you have a WooCommerce site, LMS, or membership site with logged-in users. We don’t have logged-in users on our site, so we leave it off.
Auto-Refresh Cache – We recommend turning this on. It clears the cache and rolls it over periodically. This is useful because if for some reason a page is broken or the render is broken, this will flush it out and rebuild those pages.
The advanced caching settings (exclude pages, query string caching, cookies) are more advanced – if you’re poking around in there, you’ll know what those settings are for.
CDN Tab
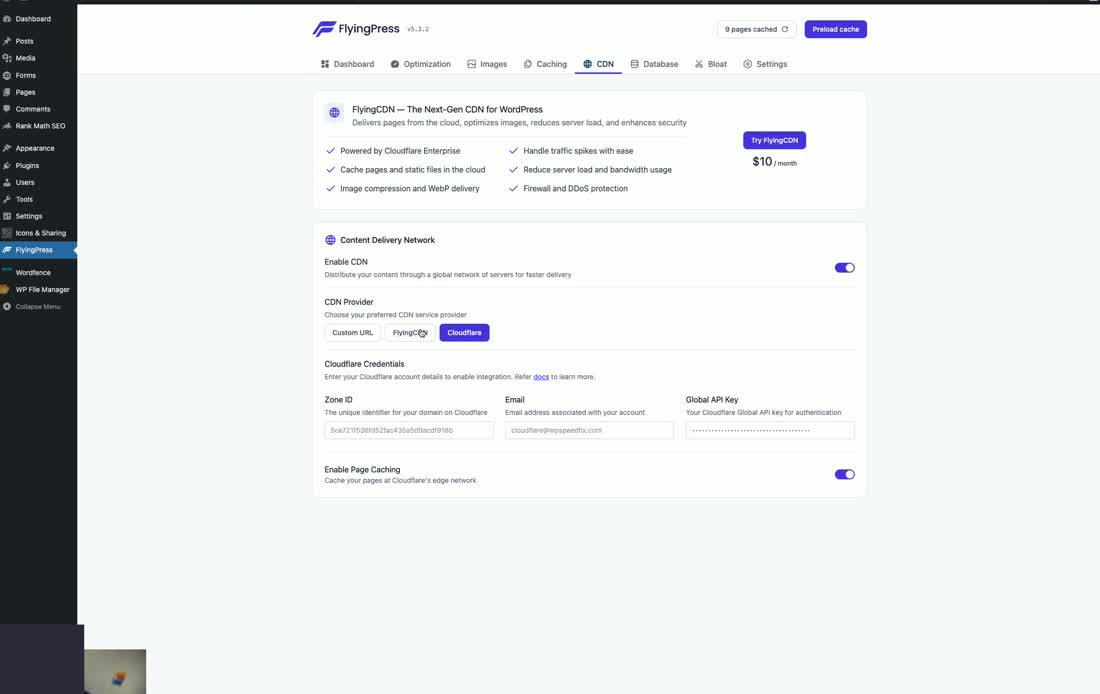
There are lots of different CDN options inside FlyingPress. We just use the Cloudflare integration. We don’t use custom CDN, and we don’t use the FlyingCDN service.
We would recommend that you use a direct Cloudflare account rather than FlyingCDN or any other integration with a cloud provider. You’ll get a better result using your own Cloudflare account, and you’ll also be able to use things like the firewall and tweak a lot of settings useful for SEO.
Enable Page Caching – This is a great feature. It replicates Cloudflare’s APO service (which costs $5/month) natively through the plugin at no extra cost. It caches your pages on the Cloudflare network, making them even faster. So there’s a $5/month saving right there if you have a simple site and don’t need the full APO service.
Database Tab – Leave It All OFF
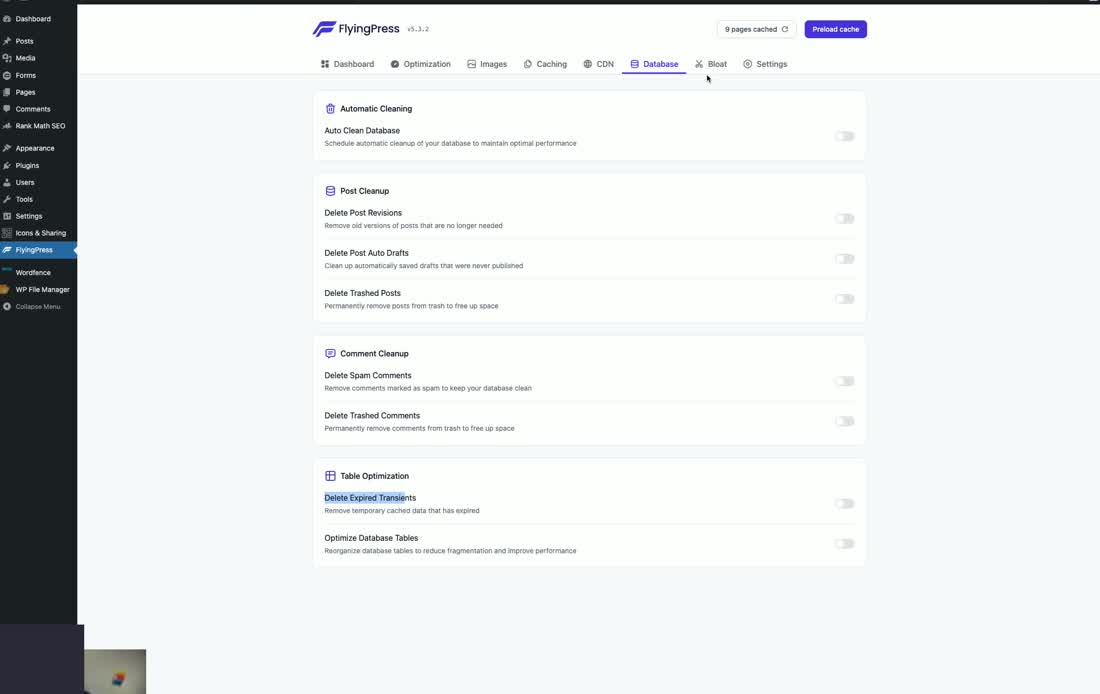
There really isn’t much to do here. This idea of “cleaning your database” is just nonsense – it’s not like cleaning your teeth. You shouldn’t need to use any of this stuff. Database cleaning doesn’t do anything for speed.
If you have a really old site and you’ve installed the plugin for the first time, there might be some transients that need clearing out. But broadly speaking, if your database is dirty and full of stuff, you’ve probably got a bigger issue that you shouldn’t be DIYing in the first place.
We just leave all this stuff off.
Bloat Tab – We Don’t Recommend It
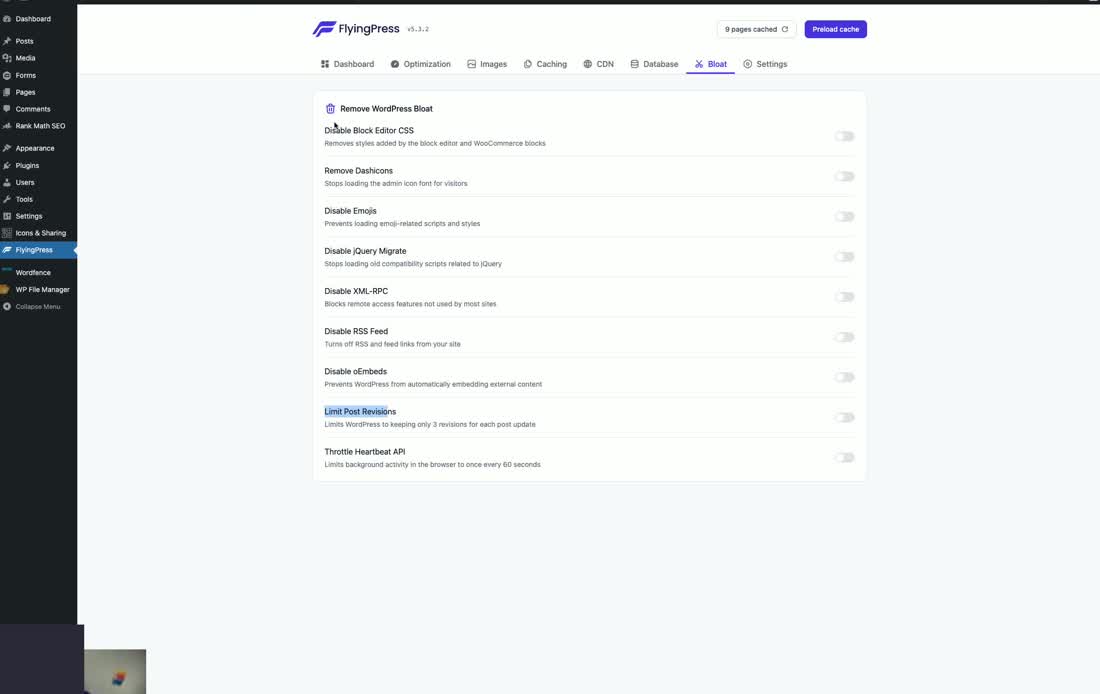
We don’t like to mess with this too much because it can break things, and most of this stuff doesn’t make anything faster. You’ll see this recommended around the web, but it’s largely a nonsense optimization.
For example, limiting revisions – why would you do that? It doesn’t make any difference for speed. It doesn’t matter from a speed perspective whether there are three revisions or ten revisions saved. It saves space in the database, but that’s not really going to impact speed unless it’s an extreme scenario.
We wouldn’t recommend using any of these settings by default unless there are particular reasons, and more often than not, you break things by turning this stuff on rather than make anything faster.
Settings Tab
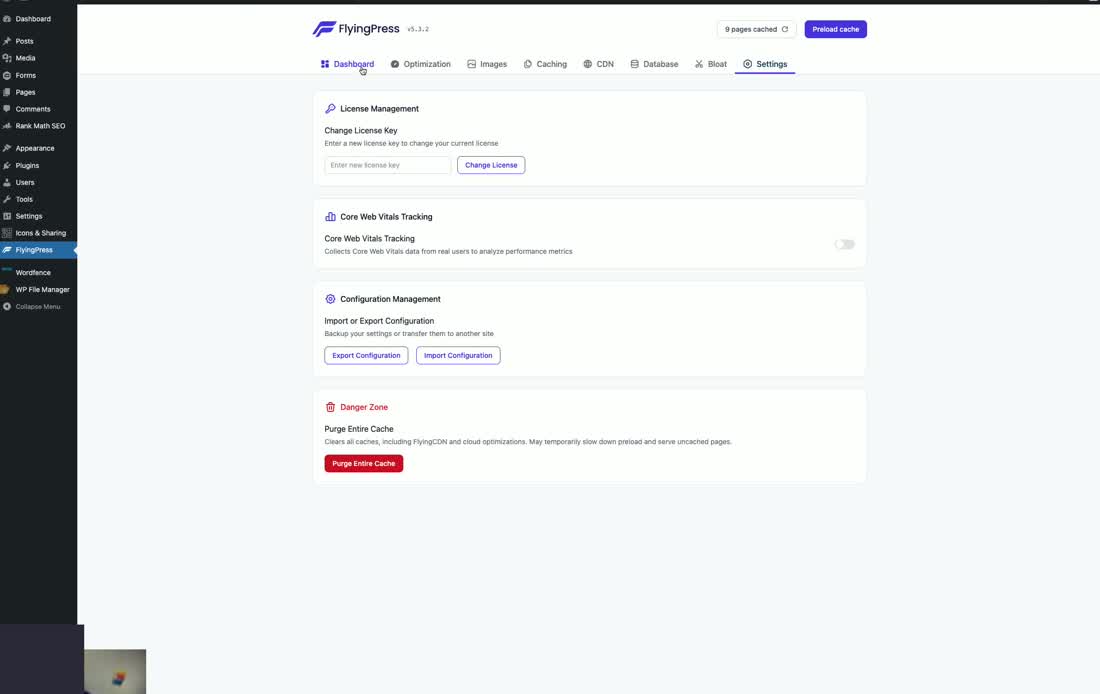
The Settings tab has license management, Core Web Vitals tracking, and import/export configuration.
We don’t use the Core Web Vitals tracking here. You can turn it on for some basic tracking, but we use our own Core Web Vitals tracker tool which is much more precise and granular.
How To Test If You’re Breaking Things
An easy way to test if any settings are causing issues is to use the Console tab in Chrome Developer Tools. Right-click on the page, click Inspect, then click the Console tab. Any errors that come with a page load will show up here in red. Each page load will have its own set of warnings and errors, so you can quickly see if something is going wrong.
A few things to keep in mind:
- Reliability over speed – When in doubt, use the more conservative settings
- Don’t double up optimizations – If your theme, Cloudflare, or another plugin is already doing an optimization, don’t duplicate it in FlyingPress
- Check the Console tab – Use Chrome DevTools to check for errors after changing settings
- Test without interacting – When testing JavaScript delay settings, load the site without moving the mouse or clicking anything to see if the full page renders
If you need help with your site, head over to wpspeedfix.com. We’re a specialist site speed optimization and technical agency. You can request a free audit from our homepage. We also have a bunch of free tools – no opt-in required – including a free SEO audit, free Core Web Vitals report, and free WordPress speed test.